IP PBX with 3CX Phone System (PBX) Server Configuration
Step 1 :
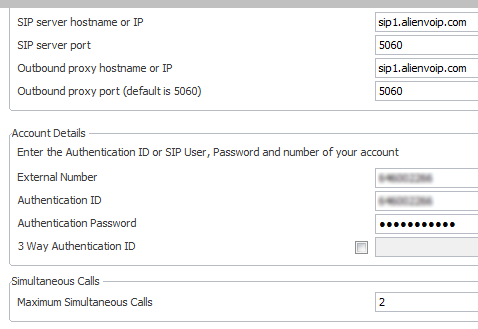
Below are the settings that worked. The first step will be to make sure the provider is registered.
Below are the settings that worked. The first step will be to make sure the provider is registered.
Step 2 :
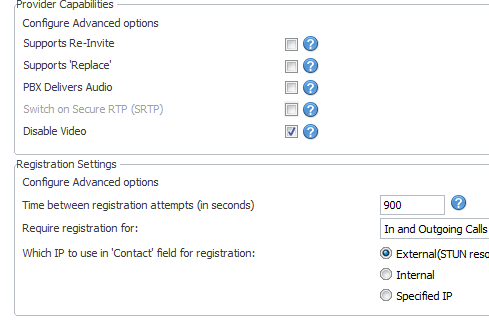
Then, proceed to the settings in the first General tab (Provider Capabilities & Registration Settings).
Then, proceed to the settings in the first General tab (Provider Capabilities & Registration Settings).
Step 3 :
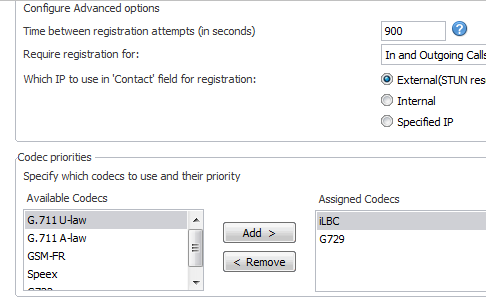
After completing the General Tab settings, please go to the “Configure Advanced Options” tab. As you can see, we have disabled some options at “Provider Capabilities”. Please take note of the assigned codecs. Set “ilbc” as the first codec, then followed by G729.
After completing the General Tab settings, please go to the “Configure Advanced Options” tab. As you can see, we have disabled some options at “Provider Capabilities”. Please take note of the assigned codecs. Set “ilbc” as the first codec, then followed by G729.
Step 4 :
Go to “Remote Connections” and you should see that the status is registered
Go to “Remote Connections” and you should see that the status is registered
Step 5 :
Next, go to “Outbound Rules”.
Next, go to “Outbound Rules”.
Step 6 :
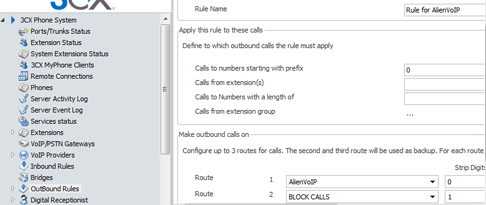
The rule sends any call starting with 0 to Alien VoIP. It’s a simple rule to test the route.
The rule sends any call starting with 0 to Alien VoIP. It’s a simple rule to test the route.
Step 7 :
Lastly, you should make sure that your extension is registered.
Lastly, you should make sure that your extension is registered.


